Showing posts with label Christmas. Show all posts

Saturday, November 3, 2012

Christmas Card

This awesome card is a Loy original.  In fact we just made them today.  I'm exited to show it to you. 
All of the items we used are from Stampin' Up.


Item List:
Versa Mark Ink Pad
Black Embossing Powder
Christmas Stamp Set
Dimensionals

Paper List:
8 1/2 x 5 1/2 Whisper White
3 1/2 x 3 1/2 Gold Glitter
3 x 3 Whisper White
4 x 5 1/4 Cherry Cobber

The stamp set we used is discontinued, but this will work with multiple stamp sets.

1. Cut all paper.
2. Stamp the Sediment on the bottom of the Cherry Cobbler Paper.


3. Stamp the 3x3 Whisper White Paper.


4. Add Embossing Powder to the inked papers.
5. Using heat set the embossing powder.
6. Using Dimensionals place the 3x3 on top of the 3 1/2 x 3 1/2 paper.
7. Using Dimensionals place the 3 1/2 x 3 1/2 on top of the 4 x 5  1/4 paper.


8. Stamp Sediment on the inside of card.


Thursday, October 18, 2012

Miracle Fudge


 I have yet to see a tutorial on Pintrest like this.  I love this recipe for fudge, it is simple, quick and tasty.  At my house we lick the spatula, mixer paddle and bowl.  Warning: This fudge is addicting!  You will want to make several different batches and your friends and family will beg for you to make them more after you give them some as a gift.
 
Milk Chocolate Fudge with Walnuts
Miracle Fudge
Ingredients:
1/4 c Butter
2 1/2 c Sugar
2/3 c Evaporated Milk
10-12 oz Chocolate Chips
6-7oz Marshmallow Cream
1 tsp Vanilla
1 c Walnuts (opt)

For this batch of fudge I used Cream de Menthe chips I'll go over variations later.

1. Line a 9x9 pan with aluminum foil and spray with cooking spray.
2. Pace Chocolate Chips, Vanilla, and Nuts(opt) in mixer bowl.
3. Put Butter and Evaporated Milk in pan.  Melt Butter.


4. Add sugar.  Make sure to stir constantly to avoid burning.  Bring to a rolling boil.


5. Add Marshmallow Cream, bring back to a rolling boil.  Boil 5 minutes.


This is the color that the marshmallow mix should look like.
If you get brown flecks, turn down the heat.
Do NOT scrape the sides and bottom.


This is what the bottom of the pan looks like, and why you don't scrape the pan ever!
And yes this will be left over after you dump out the marshmallow mix.
It looks like a waste, but will keep the fudge creamy.


6. Pour Marshmallow Mix over Chocolate Mix.  Stir just long enough to make sure everything is Incorporated and smooth.  I always stir the fudge with a spatula before I pour it into a pan.


7. Pour into prepared pan.  You can and I do suggest scraping the mixer bowl. 
8. Let sit a room temperature to cool.
9. Cut and enjoy!
 
 
Variations on a Theme
Replace the Chocolate Chips with different flavor chips such as:
Butterscotch
Peanut Butter
White Chocolate
Mint Chips
Cherry Chips
 
Kool-Aid Fudge
Use White Chips instead of Chocolate Chips and add Kool-Aid to the chips mix.
 
I hope you enjoy this recipe.  I know your friends and family will.  ~Elizabeth

Thursday, October 11, 2012

Christmas Stockings

With the Christmas Season coming up we are trying to make a few new things for the store.  Loy makes a different version of the Christmas Stocking.  I made my pattern with a stocking that was already made.  This a great project to use up jeans with holes.  I made 6 stocking with one pair of pants.  I have not finished this project, but here is the beginning of this project.

First I made the pattern then cut it out.  I then cut out the stocking from the Jeans. 


Here is the back pocket cut out


Next cut out the back part of the stocking from the leg of the pants. *Make sure to flip the pattern.*
 
 
You will end up with two pieces looking like this. I then sewed them together right sides out so that they would fray.  I think they are to plain so as soon as I figure out how to give this a little holiday spin  I'll finish up this project.
Happy Crafting! ~ Elizabeth

Monday, September 24, 2012

Jean Gift Bags

We started making these so that we could have gift bags for our scarfs this Christmas.  I had so much fun with them that I think I will make them year round.  This is a great way to use up kids jeans that have rips and stains.


The first thing I did was cut the bottom of the pants off right below the grass stains.  You could also cut just below a rip in the knee. 
 
 
 Next I sewed a bottom seam about 1/4 inch from where I cut.  Then sew another seam a 1/4 inch from that one.  This way you have a double seam.
 
 
 Next I sewed box style corners so that the bag would be able to stand up right.  I sewed an inch from the point of the bag and made a straight seam the entire length.  I sewed another seam 1/4 inch from the first to reinforce the stitching.  So this on both sides.

Next I cut off the extra corners.


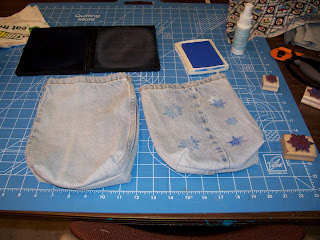
Here are the bags turned right side out,  I found them pain and wanted to dress them up a bit. 


I got out a craft ink pad.  I used a craft ink pad so that the ink would show up better.  If you have any questions find your local Stampin Up demonstrator.  They will be able to get you what you need.  I randomly stamped snowflakes on this bag to give it a finished look.


This is the other bag.  Stamped and ready to be used this winter. 


Happy Christmas Crafting! ~ Elizabeth